Ideas, Solutions, Work in progress

and other things

Callbacks to Observables in TypeScript

TLDR;

Functional programming techniques makes it possible to reduce the amount of boiler plate code required when working with JavaScript libraries that require traditional callback functions. This blog will show how to drastically reduce the code and how to turn the callback handlers into observables.

Back story

I was working on hooking the AWS Cognito JS SDK into my Angular 4 project. I was using SytemJS and RollupJS and after struggling for some time to get the bundling to work properly, I gave up and decided to just use the plain JavaScript API.

This meant that not only was I missing the nice TypeScript typings for the SDK, but also faced with the clunky callback patterns used in some JavaScript API’s.

JavaScript Callbacks

There are various common JavaScript patterns for handling async methods via callbacks. These callback mechanisms allow callers to provide a hook so that they can be called back in the future with the result or error.

One common approach is that the method requires a single callback function in addition to its normal parameters. The called function will then invoke the callback function with an error as the first parameter, or a result as the second parameter. It is up to the callback function to determine whether it received an error or not.

The following contrived example shows how the sendMsg function will invoke the callback and pass an error message or success result.

1
2
3
4
5
6
7
8
9
10
11
12
13
14
15
16
17
function sendMsg(message, callback) {
    if (message === 'dontsend') {
        callback('whoops not sending!');
    }
    else {
        callback(null, 'Success!');
    }
}

sendMsg(message, function(error, result) {
    if (error) {
        console.error("An error occurred" + error);
    }
    else {
        console.log("Message was sent successfully." + result);
    }
})

As mentioned before there are other common ways to do callbacks such as requiring separate success and error handling functions, or using objects with onSuccess and onFailure methods. However, the solution is similar regardless of the callback pattern followed so the rest of this article will use the single callback function approach above as the example.

TypeScript, Observables and callbacks

Calling such a JavaScript function from TypeScript looks something like this:

1
2
3
4
public sendMessage(message: string, cb: (err:any, res:any) => void) {

    sendJS.sendMsg(message, cb);
}

This is all fine and works ok but I don’t want the clients of my code to have to pass a callback handler. What I really want is to return an Observable to my clients. I can achieve this as follows:

1
2
3
4
5
6
7
8
9
10
11
12
13
14
15
16
public sendMessage(message: string): Observable<string> {

    let sendResult = new Subject<string>();
    sendJS.sendMsg(message,
            (err:any, res:any) => {
                if (!!err) {
                    sendResult.error(err);
                }
                else {
                    sendResult.next("Message was sent successfully." + res);
                }
            }
    );

    return sendResult.asObservable();
}

However the bit on line 6 where we check for the error is a bit tedious. I will have to duplicate this all over the place and I don’t necessarily know what to do with the error. In most cases I will just send it along for the client to deal with.

To get rid of the error handling duplication I write a function to take the subject, success and optional error handler functions and return a callback function

1
2
3
4
5
6
7
8
9
10
11
12
13
14
15
16
17
18
19
interface CallbackFunction {
    (error: any, result: any): void;
}

 function subToHandler<T>(subject: Subject<T>, successFn: (m:any) => T, errorFn?: (a:any) => any): CallbackFunction {
    return (error:any, result:any) => {
        if (!!error) {
            if (!!errorFn) {
                subject.error(errorFn(error));
            }
            else {
                subject.error(error);
            }
        }
        else {
            subject.next(successFn(result));
        }
    };
 }

The interface CallbackFunction cleans the method signature up a bit and makes things a bit easier to read.

The returned callback function checks the error and, if an error handler was provided, applies it before calling error on the subject (line 5). If no error is provided to the callback function then it will call next on the subject to pass the valid result on to the observers.

This means that I can now rewrite the send message code as follows:

1
2
3
4
5
6
7
8
9
10
11
12
13
public sendMessage(message: string): Observable<string> {

    let sendResult = new Subject<string>();
    sendJS.sendMsg(message,
        subToHandler(sendResult,
            res => {
                return "Message was sent successfully." + res
            }
        )
    );

    return sendResult.asObservable();
}

This is much better since I don’t have to call next and error on the subject and I don’t have to check for the error anymore. There is also much less code because I no longer have to explicitly handle the error. It can be fully delegated to the observers of the subject.

However, this still not perfect. I will be duplicating the Subject and Observable creation lines everywhere. It also looks a bit weird to be creating a Subject and passing it on to another function.

I can get rid of the statements on lines 3 and 12 above by writing another function which will return the Observable, relieving me from creating the subject explicitly.

Consider the following snippet:

1
2
3
4
5
6
7
8
function exec<T>(fn: (cb:CallbackFunction)=>void, successFn: (a:any)=>T, errorFn?: (e:any)=>any): Observable<T> {

    let result = new Subject<T>();
    let obs = result.asObservable();

    setTimeout(() => fn(subToHandler(subject, successFn, errorFn)), 0);
    return obs;
}

Here I add another function exec which will create a subject, turn the subject into a handler using subToHandler defined earlier, apply the function provided as first parameter and then return an observable.

Note that I create the observable on line 4 before applying the function fn. This is important since subject will only notify its subscribers of changes after the time they subscribed. Line 6 wraps the call to the function fn in a timeout to handle the case where fn doesn’t actually call the callback function asynchronously.

You’ll also notice that the first parameter to exec, fn, is a function which takes a CallbackFunction as its sole parameter. The JavaScript library functions require parameters in addition to the callback funtion, so I cannot pass the JavaScript function in to exec.

Consider the following rewrite of the sendMessage function:

1
2
3
4
5
6
7
8
9
10
public sendMessage(message: string): Observable<string> {
    return exec(
        (cb: CallbackFunction) => {
            sendJS.sendMsg(message, cb);
        },
        res => {
            return "Message was sent successfully." + res;
        }
    );
}

Here I effectively partially applied the original sendJS.sendMsg function by closing over the value of the first argument, message, and returning a new function which takes only a callback function as parameter. This allows the exec function to create the appropriate callback function, using subToHandler and pass it to the partially applied sendMsg.

In closing

By using some basic functional programming techniques I could reduce the amount of boiler plate code required when working with JavaScript libraries with traditional callback functions. I managed to reduce the code drastically and turned the callback handler into an Observable which clients of my service can subscribe to.
Ubuntu and the Dell XPS 9560 Touchpad

I recently purchased a Dell XPS 15 9560 which I use for my day to day work, with Ubuntu 16.04 as the only operating system. It is a wonderful laptop and Ubuntu runs on it with virtually no issues. There is one issue which bothered me more than others. The touch pad sensitivity and palm detection. Whenever I tried to type a long piece of text I would invariably find my self type a couple of words somewhere else on the screen.

The problem was that when I reached for letters in the middle of the keyboard such as T or Y the inside bit of my palm would touch the touchpad in the top corner. The touchpad percieved that as a tap and I’d continue typing wherever the mouse pointer was at the time.

I usually have a mouse plugged in and have set the touchpad to be disabled when a mouse is plugged in. I used these instructions from askubuntu to do that. It helped but I do quite a bit of work away from a desk and then I need the touchpad enabled.

After a bit of googling a found a couple of questions on answers on numerous forums and managed to piece things together from there. See the references at the bottom of the post.

To make it work you first you have work out what your touchpad is called internally. You do this by running:

1
xinput --list

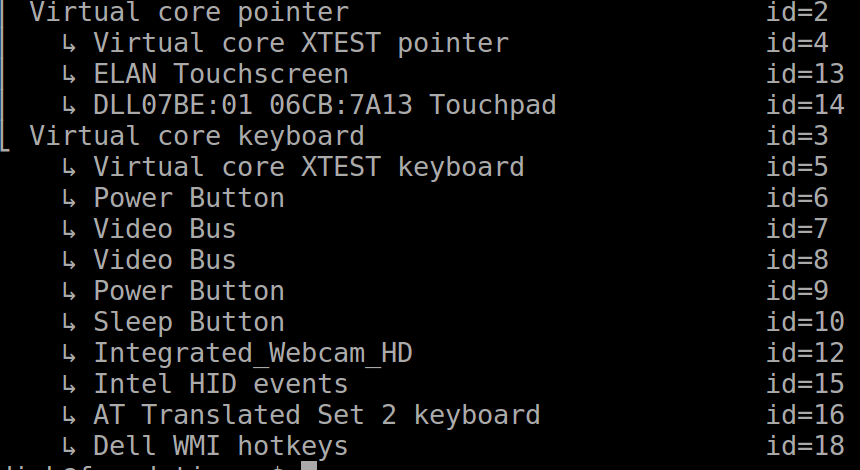
which prints something like this:

From this output you can see there are a number of touch input devices:

  • Virtual core XTEST pointer - Not entirely sure what this is
  • ELAN Touchscreen
  • DLL07BE:01 06CB:7A13 Touchpad

Look for the one called ‘Touchpad’. You can now list all the configuration for this device by using xinput list-props. For the XPS it is:

1
xinput list-props  "DLL07BE:01 06CB:7A13 Touchpad"

This yields a long list of properties and their values. Look for the following:

  • Synaptics Palm Detection
  • Synaptics Palm Dimensions
  • Synaptics Area

In my case these where set as follows:

Property Value Description
Synaptics Palm Detection 0 This means palm detection is off
Synaptics Palm Dimensions 10, 200 The first value refer to the minimum
Synaptics Area 0, 0, 0, 0 This describe the touchpad surface area where touches are detected.


Most of the references I found was talking about changing the first two properties Synaptics Palm Detection and Synaptics Palm Dimensions however, changing those didn’t make a difference for me. The cursor still jump around because my palm looks like a finger at the edge of the touchpad no matter how small I make the palm detection setting. This is understandable since only a small part of my palm actually touches the touchpad surface while typing.

The setting which made the biggest difference for me was the last one Synaptics Area. It is used to manage the detection of touches at the edges of the touchpad. By changing the four values associated with Synaptics Area you can change the area of the touchpad that is active to touches.

Note that the Synaptics Area is about inital touches. The disabled areas still work if a touch is initated in the active area

The first value defines how far from the left of the touchpad edge touches are detected. Anything to the left of this value is not considered a touch. The second value sets how far to the right the active part of the touchpad stretches. The third sets how far from the top edge the active area starts and the fourth is how far down the active part stretches.

To configure these you first have to work out how large the touchpad is by running the following command:

1
less /var/log/Xorg.0.log | grep -i range
1
2
3
4
5
6
7
8
[     6.904] (--) synaptics: DLL07BE:01 06CB:7A13 Touchpad: x-axis range 0 - 1228 (res 12)
[     6.904] (--) synaptics: DLL07BE:01 06CB:7A13 Touchpad: y-axis range 0 - 928 (res 12)
[     6.904] (--) synaptics: DLL07BE:01 06CB:7A13 Touchpad: invalid pressure range.  defaulting to 0 - 255
[     6.904] (--) synaptics: DLL07BE:01 06CB:7A13 Touchpad: invalid finger width range.  defaulting to 0 - 15
[     7.028] (--) synaptics: SynPS/2 Synaptics TouchPad: x-axis range 1278 - 5664 (res 0)
[     7.028] (--) synaptics: SynPS/2 Synaptics TouchPad: y-axis range 1206 - 4646 (res 0)
[     7.028] (--) synaptics: SynPS/2 Synaptics TouchPad: pressure range 0 - 255
[     7.028] (--) synaptics: SynPS/2 Synaptics TouchPad: finger width range 0 - 15

From this you can see that the touchpad as a horizontal range of 0-1228 and a vertical range of 0-928. I don’t know what these numbers mean or measure, but I played around with different values a bit and found that, for me, the magic number is 70.

1
xinput set-prop "DLL07BE:01 06CB:7A13 Touchpad" "Synaptics Area" 70 1168 70 0
  • Start detecting touches 70 from the left
  • Stop detecting touches 1228-70 = 1168 from the left
  • Start detecing touches 70 from the top
  • Detect touches all the way down

This setup work perfectly for me without even changing the Synaptics Palm Dimensions. I can now type without worrying about my cursor jumping all over the place. The best part is that if you initiate a drag of the pointer in the active area of the touchpad, the touchpad will track your finger all the way to the edge, even in the ‘no touch’ zone.

To make the changes permanent put them in a script and run the file at log in time using the startup applications gui.

References: